Whether a 4runner, Taco, Jeep, Land Rover, or any other 4x4, we have all quickly realized that stock suspension leaves a lot to be desired when off-road. The OEM suspension is designed for highway use, and if you get a rig "built" for "hardcore" off-road use (TRD, Rubicon or the like) they are not designed to perform off-road with the kinds of loads we overlanders put on our rigs. I figured up the other day as of our last trip to Big Bend we carried an additional 850 pounds over stock made up of the roof rack, RTT, water, fuel, ice chest, rear bumper and the like on the rear suspension. That does not count the front bumper and winch. I have not added any armor beyond bumpers yet. That is a lot of weight over stock.
This is nothing new, we all know this. Where the debate starts is, what to replace the OEM suspension with.... Five minutes on google looking for any vehicle and you will gobs and gobs of options. All guarantying to be the best, the best on-road and off-road, the best articulation, the smoothest ride.... you name it one of them will promise it. Some are great, some are good and some are awful.
Before I launch into my thoughts, let me preface it by saying; these are MY thoughts. I am not an expert, I am a fairly analytical gearhead. I am basing what I write, off of my own experiences mostly coupled with research of available suspension systems for my Jeep JK and YJ, Coil sprung and Leaf sprung respectfully.
How can you tell which one is actually a great suspension system? Well, let's start with some basics. Cheap does not equal good, much less great. This applies to full kits as well as piecing together parts from good/great systems. A full system will, most of the times, outperform a bastard system (pieced together from different brands).
One of the biggest things to think through when picking a system is what are you using your rig for? Daily driving, rock crawling, mud bogging, overland/expedition use or a combination of any number of those. In all of my research, I have not found a system that is perfect for all conditions and uses. If you go for a system designed for daily driving it will be soft and smooth, very comfortable driving 75 MPH on the highway, but will not perform well when loaded down for overlanding.
This is what makes picking a suspension system so difficult. Now here is what I do when picking. I look for a company that offers multiple different systems based on what activity you will be doing. In the Jeep world, one of the best examples of this is Rock Krawler. They offer 7 different mid-arm options for the Jeep JK in just the 2.5" lift (they offer the same options for 1.5" and 3.5"). They also offer 5 different options in long arm systems. While there are components that interchange across the different options, they each address a different need. From Stock Mod to X-factor, each system builds off the others while addressing a particular need.
Another important factor, altho obvious it tends to be overlooked, is spring technology. I am not an engineer so will not try to explain in depth all the different factors that go into spring design. What I can say is this, you can not take OEM spring specs, add a couple of extra coils to it and expect it to ride like stock, only higher. Spring heights are based on spring rate and desired compression height. Suspension companies have addressed this in different ways, some run a heavier spring rate, others run multi-spring rate. Each has its merits and applications. I personly like the multi-rate springs better. It makes sense that as more weight is added the spring rate increases.
Lastly, the lift needs to address the geometry changes your lift is putting on the suspension system on a whole. For JK's, TJ's and other coil sprung solid axle rigs, you have to address castor and/or pinion angles. As well as your drag link length and possible pitman arm drop. These are vital components to ensure on and offroad control. Once again a high-quality lift will address these problems.
The whole point of this post is not to endorse one brand as being the best, rather promote a quality, well thought out and designed system over a cheap system that you will regret from day one. We recently purchased a 2010 JK that the PO has lifted with a cheap lift, their only concern being increased altitude. Lucy (the JK) still had stock control arms front and rear, still had the stock track bar in front as well as stock sway bar links front and rear. The shocks were miss matched and the tires were 10 ply light truck tires. This combination made for a rough ride with bump steer, and because of the stock track bar in the front, a lean to the driver's side as well an axle that was not centered under the jeep. The worst part being, extremely touchy steering because the front axle caster angle had not been corrected.
One of the first orders of business after buying Lucy the JK was to replace the miss matched shocks with Rancho 9000XL adjustable shocks, then we replaced the crummy lift with a 2.5" Expedition lift by Rock Krawler that I got from Northridge 4X4. This replaced all 8 control arms with heavier adjustable arms, new sway bay links, new track bars front and rear, 2.5" springs on the front and 3.5" springs on the rear. Overall a fantastic kit at a competitive price.
In short, buy the good system, don't go cheap. You will thank me in the long run.
-Caleb Austin
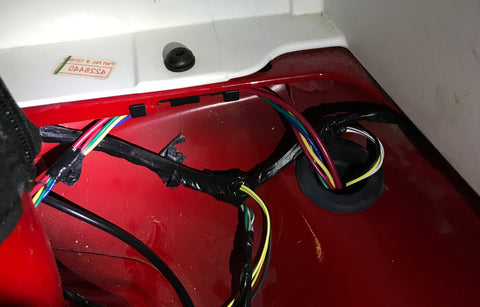
]]>Now granted when I took this picture I was tearing out old factory wiring out of my YJ when I was doing an engine swap last fall, but you get the point.
I have looked at the cool digital controllers out on the market and have loved what I have seen, but I am kinda old school. I like something I can work on, something that I can make work if I am out in the backcountry and it stops working. So over the weekend, I started wiring up a couple of sets of Extreme LED light PODs we had from our July Overlander box on our JKUR. While I was at it I went ahead and preemptively ran wiring for future accessories. Here is the basic diagram of what I did:
So now I will go over the long winded written version, hold on. First, we will start with running a main "feeder" wire to the rear of the jeep with 4 signal wires for relays. I used a 10Ga wire for the feeder and the smallest Ga I could find at the local auto parts store, 18Ga, for the signal wires. Since it is a main feeder for the rear, I installed a 30 amp 12V breaker on the side of the battery tray to protect the wiring.
When I ran the signal wires a went ahead and twisted them all together to make putting them into the wire loom all the easier. I accomplished this by clamping one end of all four wire in my vise, then clamped the other end of the wires in my cordless drill and then went to town, this creates a nice and neat twist. After twisting the wires I inserted them plus my feeder wire into the loom remembering to tape the loom every couple of feet to help keep the wires in, all in all, I had 10ft of loomed wire and an additional 10ft of10GA and 20ft of the twisted 18GA wires.
Once the loomed wire was ready I dropped it down beside the battery box and pulled the whole length of the loomed section through. This allowed me to take the end and run it up the cavity behind the tail lights. Instead of drilling a new hole to access the rear of the cabin, I utilized the existing hole and grommet for the tail light.
I then worked my way back toward the battery zip-tying the loom into place.
From there I ran a feeder wire from a 30AMP fuse across the engine compartment to the driver's side of the jeep, this ran the relay for the front lights as well as the power for the switches in the cabin. While running that wire I combined it with my 4 signal wires from the back, in some oversized loom, I am sure I will need the extra loom space for future wiring projects.
Once in the cabin, I used some universal rocker switches to control the front lights and the rear lights I plan on installing in the very near future.
As you can see I have room for at least two or three more switches, and since the signal wires are already run to the back all I need to do is run a power wire from my new relay/fuse panel in the rear.
The blue wire runs back into the engine bay to a relay that then powers the front two PODs. Since grounding problems are at the root of most electrical gremlins I ran the POD's ground wire back into the engine bay and utilized a factory grounding point to ensure reliability. I combined the power wire and the ground into some 1/4" loom and dropped it down to the frame rail. I ran it under the front clip across the top of the bumper and using zip-ties ran it along the back of the bull bar to the lights. At the lights, I used insulated spade connectors so, if need be, I can disconnect the lights easily.
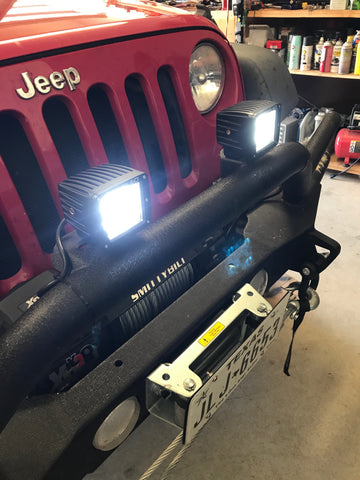
I have had these on now for a couple of months and I love them! The floods are fantastic for fog lights, as a matter of fact, I am going to replace my factory fog lights with a set of these. They are super bright and the quality is great! The only complaint I would have is the nuts for the stands do not catch the housing to keep them from spinning so I had to wedge a flat head screwdriver on one side to hold the nut while tightening up the stand. Other than that, I have been extremly happy with Extreme LED.
This is a basic overview of how I wired up the Extreme LED PODs. Let me stress, I AM NOT A PROFESSIONAL. If you are not comfortable with 12V wiring please get a professional to do it for you.
]]>